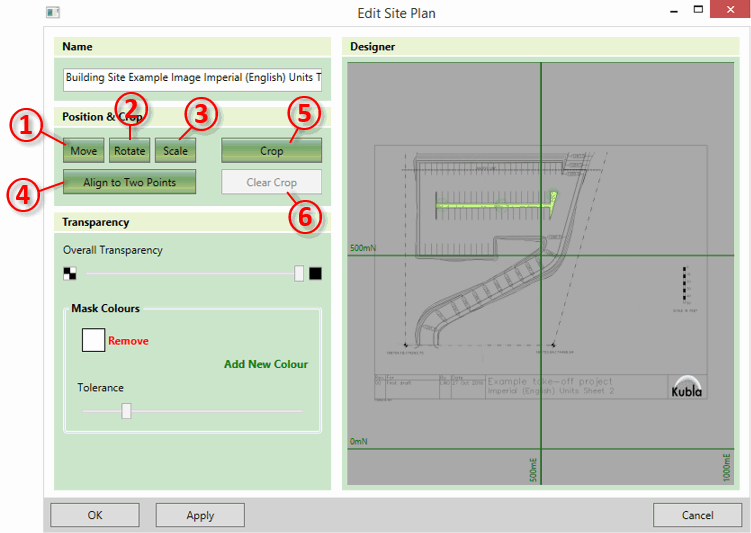
The site plan is positioned into its real-world location by scaling, moving, and rotating the image as required. Alternatively, if you have two known co-ordinates on the image you can define these and the software will scale, rotate and move the image to match these two co-ordinates.

The following controls are used to define the image's position:
-
①
Move
This option allows you to move the image by defining a point on the image and then typing its position in the real world. This is useful if there is a co-ordinate defined on your image. It is important to remember that you should move the image after you have done any scaling and rotation you need to do, because these operations will cause positions on the image to change.
-
②
Rotate
This option allows you to rotate the image by defining a north reference angle on the image. This is useful if you want to show your image in a different orientation to that on the image. E.g. you want it aligned north-vertical and there is a north arrow on the image (which is not vertical)
-
③
Scale
This option will scale the image. You can do this with one of two methods:
- By scale (PDF's only). Type a defined scale for the PDF, such as 1:100, or 1"=25'.
- By Length. Specify a length on the image and then type its length in the real world. This option is particularly useful if you have a defined length on your image. E.g. a scale bar or a marked dimension.
-
④
Align to two points
This is the easiest option if you have two co-ordinates defined in the image. It allows you to specify the two points on the image and then type their co-ordinates in the real world. The software will then scale, move and rotate as required to match these two points.
Once you have selected one of these options, you will receive further instructions depending on the option you selected. These are described below:
-
Move
-
Select a base point to move
Define the point which you want to move by clicking once in the preview.
-
Type or click on screen to set the new position of the base point
Type the location (X and Y) that you want this point to be moved to. Alternatively you can click on the screen to set the new point position to another screen location.
-
Select a base point to move
-
Rotate
-
Draw the north arrow (base to tip)
Draw a line on the preview to define your reference north angle. Click once to start drawing the line and a second time to finish.
-
Draw the north arrow (base to tip)
-
Scale
Select the option you wish to use ('By Scale' or 'By Length') and then...
-
Specify the new scale
Type the new scale for the PDF.
... OR ...
-
Draw a line along a scale guide or any other known length
Draw a line on the preview to define your reference length. Click once to start drawing the line and a second time to finish.
-
Enter the new length
Type the length you want the reference length to be scaled to.
-
Specify the new scale
-
Align to two points
-
Select the first point to align
Define the position of the first reference point by clicking once in the preview.
-
Type or click on screen to set the new position of the first point
Type the location (X and Y) that you want the first point to be moved to. Alternatively you can click on the screen to set the new position to another screen location.
-
Select the second point to align
Define the position of the second reference point by clicking once in the preview.
-
Type or click on screen to set the new position of the second point
Type the location (X and Y) that you want the second point to be moved to. Alternatively you can click on the screen to set the new position to another screen location.
-
Select the first point to align
Once you completed the instructions on the prompts, the prompt will disappear and the image will be adjusted as you have specified.
You can also crop the site plan to remove any unnecessary borders and titles. This is done by clicking on the Crop⑤ button. You will be prompted to draw the crop rectangle on the screen. You can clear this crop by clicking on Clear Crop⑥ and you can always adjust it by clicking again on the Crop⑤ button.