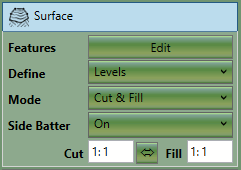
The feature surface element is used to define a complex surface specified by outlines, contours, break-lines and points. This element
is most commonly used for take-offs such as those needed by contractors for bidding purposes.
The properties that are exposed for this element are summarised below.

|
-
Features
The edit button will open the take-off window so that you can define the
outlines, contours, break-lines and points which define this surface. For more
information on the options available in the take-off window see Elements Panel
-
Define
This is the way that the surface levels should be defined. Options are 'levels' which uses the levels specified without
modification, 'levels & offset' which applies an offset
to the levels specified. The offset option is mostly used to add construction thicknesses by specifying a negative
offset. Lastly a 'levels & 3d offset' option allows the
surface to be adjusted in X and Y as well as in Z.
-
Offset
This option is only visible if offset options are selected in the 'Define' menu. It allows you to offset the entire
surface in X,Y and Z. This is useful for accommodating for a construction thickness of finding a balance.
-
Mode
This is used to specify if the surface should have cut, fill or both. Most commonly cut and fill will be specified.
-
Side Batter
The feature surface boundary is joined to the ground by side slopes. The side
batter (set as a ratio of vertical to horizontal) dictates the angle of these
slopes. You can set different side batter angles for side slopes that cut into the
ground and for those that fill into it. Turning side batter off will result in the
feature surface being joined to the ground with vertical sides.
Between the
Cut and Fill is a button which (when depressed) will Synchronize Side Batters.
|

|
Sometimes called a super element for its ability to produce the results of any other element, the
'Feature Surface' is described in the video
Proposed Levels - Feature Surface
.
|

